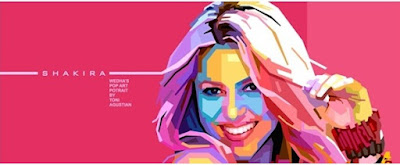
This tutorial is originally from the blog of Toni Agustian/PopBox WPAP , I simplified and put here for your convenient reading
HERE ARE THE STEPS OF HOW I MADE THIS SHAKIRA…
BY TONI AGUSTIAN | POPBOXWPAP.BLOGSPOT.COMThe Requirements: COREL DRAW, I SUGGEST COREL DRAW X5 OR AT LEAST X4 WHICH IS THE SMART FILL TOOL ARE ALREADY AVAILABLE + WITH THE PICKER TOOL IN IT
First, choose the photo you want and bring it to the Corel Draw window, you can use import or just drag the picture to Corel’s window. resize it so fit to the paper template. adjust the brightness and contrast or anything you want to make this picture better. then after you done with all those stuff, lock this picture by “right click –> lock”… and you ready for the next step. (to unlock just right click the locked image and click unlock)
Using the “freehand tool“ make the connected line on every different gradation aspect of the photo. Those aspects are [ brightness, the colors differences, saturations, etc..]. those lines must be connected (to make a free form box) in order to be-able to fill them with the color using the paint bucket or the smart fill tool, if not then the color will leak to the neighborhood area. to avoid leaking press “ALT+Z” its a shortcut to “Snap to Object”, so whenever you got close to a point it’ll be snapped. press that shortcut again to turn it off.
Try this step from a hardest area first like the eyes, finalize that part and take the next step.
In this steps we’ll use many tasks using this fancy “Smart Fill Tool” from Corel.
Okay, now click on this tool –> then click on the color box on the property bar and click color picker, next pick the color from the area you already blocked with lines (free form box), take the most dominant color in that area (box).
After picking the color the tool will change automatically to a bucket fill tool, and click it to the area (box) where you pickup that color and ....viola…(if its not leak) than you’ve made it (filling a block with the dominant color).
After creating all the blocks using smart fill tool then the next step is to delete all the curve lines you’ve made on the earlier step
After picking and pouring the colors to all the blocks you’ve made. than the next step is the hardest one, that is “changing the colors”.
First, duplicate the picture you’ve made and make it a bitmap so it won’t be a burden to your processor. why duplicate?… read next!..
In this step I can’t explain too much. all you have to do is creative improvisation, choose the colors you like (as long as still in the same proportional gradation lightness of area). Keep coloring while still watching the duplicated picture from the previous step so your drawing likeness won’t go far from the reference, do it for all part of the picture.
 I suggest you to pick the rebel (unnatural) colors to obtain more pop art effect to this picture. Try not to use the body natural colors like skin colors. Otherwise it won’t makeup like a pop art drawing.
The final step is adding the nice layout to the picture you’ve made like placing a backgrounds, text or anything you want as long as it don’t break the beauty of the image you’ve made. I suggest you use the simple font to combine with this WPAP style.
Okay, I wish this simple tutorial will help!


aa
ReplyDeleteThere are a number of good things about buying painting for your residence. It has no standards in its appearance as long as there's satisfaction in your eyes. Discover here to know more about andy warhol art.
ReplyDeleteThe worldwide range of the significant auction houses can't be rivalled by the majority of commercial galleries. You are curious to know more about andy warhol art, read this.
ReplyDeletePop art has also been used to express some very disturbing themes. Many of the images that were created were meant to shock the public. Check out this site to know more about andy warhol prints.
ReplyDelete