Originally this tutorial is in “Bahasa” made by Desain Studio , I tried to translate and simplified for more convenient reading, the tutorial is good and simple to understand how pop art portrait drawing and coloring is made... thank you Desain Studio
Wedha known as illustrator for “Lupus” a teenager love-story novel, is also well known as the founder of WPAP (Wedha’s Pop Art Portrait) which had been published at Desain Studio (see overview here).
Wedha’s work is superb, though initially found in 1990-1991, however up to now WPAP style is becoming more and more popular. Some WPAP communities emerge through social network such as facebook, blog and in another forums. Does not want to miss the chance Desain Studio this time try to present How To Make WPAP Tutorial for the reader.
In this tutorial, we will use Adobe Illustrator . Not a matter if using CorelDraw or Freehand, the steps are the same.
STEP 1
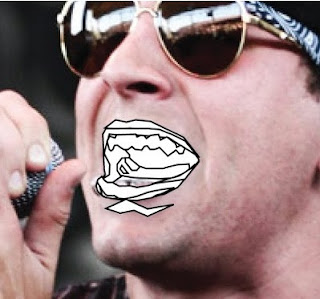
Use Pen tool (P) to draw part of the mouth. Draw with linear lines and not to be curved and make it boxed based on lightness gradation of the picture. Meaning the boxed plane area of the pen tool drawing is depicted according to the colour of the face (see picture)
STEP 2
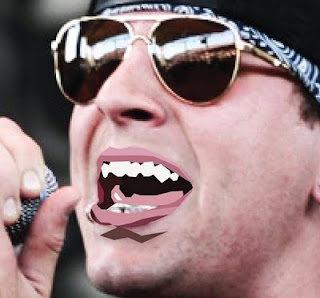
When finished, put color in the boxed plane area of the pen tool drawing with the the same color or nearly same color of the picture. Use eyedropper tool (I) for this step. Select the boxed area you want coloring, then press I button on keyboard to select eyedropper tool and click the sample color you want to pick. For example if the color to pick is part of the lips, click eyedroper tool on the lip. Do it again till all boxed area are colored
STEP 3
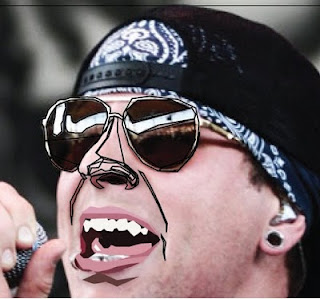
Move to the upper part, draw boxed plane area for the nose and eye glasses. The likeness of the face depend on how accurately and correctly we make up the boxed area in detail on the area like mouth, nose and eyes.
STEP 4
STEP 5
Move to part of cheek and neck, do not draw too detail, make bigger boxed plane drawing. Remember to draw according to the same lightness gradation of the colors shape. Though not detailed drawn the shape can be identified by the color in each plane.
Finalized by drawing more boxed planes of all other parts to complete the drawing.
STEP 7
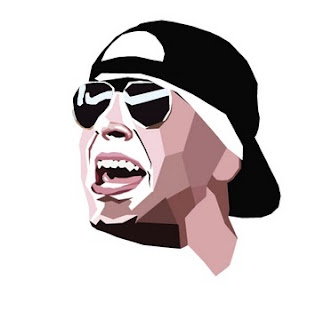
This time we have made the shape and likeness of the face. Now separate the group vector planes from the reference picture, and prepare to replace the basic colours with pop-art colours.
STEP 8
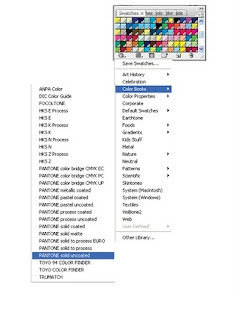
In WPAP style, the colours used is hardly different from the colours of the reference picture and do try playing with the colour gradation. As an alternatif in Adobe Illustrator we can use pantone colours. Just select Window > Swatches then click icon swatches library menu in the lower part of swatches palette, select Color Books > Pantone Solid Uncoated. It will open the Pantone Solid Uncoated palette.
 STEP 9
 For tips in colouring your WPAP artwork, just follow the lightness gradation of the reference picture. Forexample for the lighter colour used the light colour such as yelow, light green, pink, etc. On the other hand, the area of darker colour shall be filled with dark colours such as blue, dark red, green, brown. etc.
Shown here WPAP drawing of M Shadow (Vocalist of Avenged Sevenfold band) as applied on a poster.


No comments:
Post a Comment